Restoring Windows MBR (Vista) – bootrec is also your friend August 22, 2008
Posted by amazingrando in Linux Tips, Vista.3 comments
A lot of people have found my previous blog post about restoring your master boot record (MBR) helpful. I did assume, however, that you were using Windows XP. But, what if you (gasp), have a dual boot configuration with Windows Vista? Vista has a different boot loader that can be quite annoying, and the tools to restore your MBR have also changed, but not a lot. So, here are the steps.
Step 1
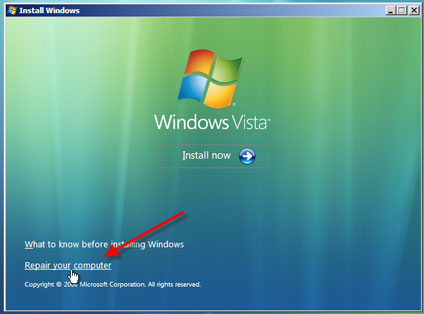
The first step is to pop in your Vista installation disc and boot from it. This will bring you (slowly) to the first screen of the installer.
Step 2
When you see this screen, change the language or keyboard if you need to, and then click “Next”

Step 3
When you get to this screen do not click “Install.” Instead, click on “Repair your computer” in the bottom left. This will take you to the Recovery Environment (WinRE)
Step 4
The recovery environment will search your hard drives for Vista installations. If you need a RAID driver or something unique, there is a button to load that driver (uncommon). You should see your Vista installation on your boot drive. Click “Next” to go to the next step

Step 5
There are two options here, fix it automatically or fix it manually by the command line.
Option A – Auto fix
With this option you just click on “Startup Repair” and let Windows check and repair the MBR. This worked for me once, but it may not work for you. I also think that it might reinstall the boot loader. If you want only the MBR fixed but not the crappy Vista bootloader then you don’t want this option. Once you run the fix, you can click “Restart” and let the system boot off your newly fixed hard drive.

Option B – Manual fix
For the aforementioned reasons I think this is a better way to go. With this way you know exactly what you’re fixing (hopefully). This is very similar to the FixMBR command that Windows XP has, which I talked about in my previous post. Here, rather than clicking on “Startup Repair” you instead click on “Command Prompt.”

Once it comes up, you type:
bootrec /FixMbr
With a bit of luck it will say that the operation completed successfully. You can then close the command prompt window and click on the “Restart” button.
More details of the bootrec.exe commands can be found in this Microsoft KB article.
Hopefully this will work well for you, as it did for me. If you encounter any problems or have more insights, be sure to add a comment below and I’ll try to incorporate them into this tutoiral.
AR
Where Have I Been? and the Summer of Hardy Haron July 7, 2008
Posted by amazingrando in General, Windows-Linux Transition.Tags: encryption, Hardy Haron, HD, PhD, Ubuntu, Updates, video, WEP
add a comment
Thanks to all of you that have been submitting comments. I’ll try to research a few and update the entries. I think there are a few tweaks needed for Hardy Haron too. So, where have I been? Well, it was the first year of my PhD program and I was buried in work and shuttling back and forth between France and Singapore. It’s finally over and I will be enjoying some of the slower pace of the summer by moving to Hardy and trying out some new stuff: HD video, encryption, WEP cracking, bibliographic databases, etc. If you have any requests for me to try to figure out, let me know!
Share folders via Samba without a password – easy! June 3, 2007
Posted by amazingrando in Linux Tips, Windows-Linux Transition.23 comments

Coming from the Windows world to Linux, one of the first things I wanted to do was to share directories on Ubuntu with my Windows laptop to easily transfer files. In Windows I can just right click a folder, go to sharing, and enable it. No users and passwords to set up. It goes without saying that this is not secure and you want to be careful doing it, but it’s a great way to share files between computers at home.
Sadly, it’s not yet that easy to do this in Ubuntu (let me know if there’s a simple way to do it with other distros). Ubuntu makes it easy to install the samba server. If it’s not already installed, you can right click on a directory and try to share it. It will ask you to install samba. You can also use sudo apt-get install samba or via the add/remove programs under the application menu.
Ubuntu, however, isn’t able to set it up for anyone to access without logging in, yet. It will only share with a login and password. So, to do this you’ll need to edit your /etc/samba/smb.conf file. Here’s how share a folder without a password or login:
- In a terminal type
sudo gedit /etc/samba/smb.conf(kubuntu users type kdesu kate /etc/samba/smb.conf) - Find the ### Authentication ### section (might be called Administration in older versions of Samba), where it says security = user
- Change it to
security = shareand make sure the line does not start with a semicolon. If it does, remove it. - A few lines down from that you’ll see
; guest account = nobodyRemove the semicolon at the beginning of the line. - Scroll to the very bottom of the file and put in the following, adjusted for your own system
[Share name]

writable = yes

path = /path/to/directory

public = yes

guest ok = yes

guest only = yes

guest account = nobody

browsable = yes - Save the file and quit gedit
- In the terminal restart the samba server to reload the conf file
sudo /etc/init.d/samba restart
That should do it. If you want to try a more sophisticated way to configure shares, there is a GUI application called gsambad. I’ve found it overkill for just doing a simple share, but for others it might be quite useful. In Ubuntu you can download it from add/remove programs.
Enjoy!
Overclocking the Intel Core 2 Duo E4300 makes me happy! May 15, 2007
Posted by amazingrando in General.2 comments
In the last few years I’ve been running computers from Dell and HP, but when I first switched to PCs from the Mac about 10 years ago I always built my own machines. Back in the day of the overclocking my Celeron 300MHz processor to 464Mhz it was great fun. The Celery (Celeron) was cheap and you could very easily squeeze a 50% or greater overclock out of it with just a bit of tweaking and some better cooling. Heck, often you could get that without anything but the stock cooler.
Recently I sold my Dell Optiplex Pentium D system and decided to build a system of my own. I picked up an EVGA nForce 680i SLI motherboard, which is an amazing board. Fast, stable, and loaded with all the extras. I suppose that’s why it’s getting so many rave reviews. Reading up on the overclockability of the E4300 processor, I got one of those for now with an eye to a quad-core processor later in the year. I also picked up some nice PQI Turbo DDR2 RAM (2GB kit).
So today I finally got around to some testing. I only have the stock cooler on the processor and I haven’t fiddled with any voltages yet, but the results are impressive:

I’ve got it running at 3.0GHz very stably with a 1.35GHz FSB. I ran the PCMark05 CPU and Memory benchmarks to see just what that means in terms of performance:
Stock Settings
9 x 200 = 1.8GHz CPU, 800MHz FSB 5-5-5-16 timing
Stock Speed
CPU: 4516
Memory: 4038
Overclocked Settings
9 x 337.5 = 3.0GHz CPU, 1350MHz FSB, 4-4-4-12 timing
Overclocked Speed
CPU: 7689
Memory: 6470
With that overclocking, I’m getting a 70% increase in CPU performance and a 60% increase in memory performance – for free! w00t!
How does that compare to other CPUs? Well, check this out. Sharky Extreme has a good review of the Core 2 Duo processors and the processors’ respective PCMark05 CPU and memory performance figures. The results are fantastic. My overclocked $115 processor beats out the $970 Core Duo 2 X6800 Extreme CPU (well, at stock speed anyhow). Happy days! 🙂
My system / Core 2 Duo X6800
CPU: 7689 / 7515
Memory: 6470 / 6059
Running Windows in Ubuntu part 2 – VirtualBox rocks! May 3, 2007
Posted by amazingrando in Linux Tips, Windows-Linux Transition.add a comment

Following up on my prior post about running Windows (or other OS’s) in Ubuntu, I kept searching around for something better than VMware server. Why? I wanted something that was:
- Not only free, but open source
- Easier to install and configure than VMware
- Had a GUI for managing virtual machines
- Fairly stable and speedy
It seems like a tall order, but I found Innotek’s VirtualBox a few weeks back. It’s open source (GPL), easy to install and configure, has a nice GUI for configuring VM’s, virtual drives, etc. There’s no need for serial numbers like with VMware. It offers host accelerator drivers for Windows and other OS’s. Overall it’s been very stable for me. Oh, and they have good documentation! At present this is my recommended choice for running another OS under Ubuntu.
How to install:
- Download the .deb file of VirtualBox for your version of Ubuntu
- Use GDebi package installer (right click on the package from Nautilus), or you can use
sudo dpkg -i *.debwhere the asterisk is the name of the package file you downloaded - This should install VirtualBox and any dependencies
- When it’s done you’ll need to add yourself to the new vboxusers group
- Open /etc/group with GEdit
sudo gedit /etc/group - Find the line
vboxusers:x:1001: - Immediately after the last colon, add your user name. For example, if mine is rando, then it would now look like
vboxusers:x:1001:rando - Save the file
- Open /etc/group with GEdit
- Having done that, restart
- Finally you can run VirtualBox from the command line and set up a virtual machine (an icon will also appear under Applications -> System )
I have skipped many options for pre and post-installation in order to give you a quick run-down on how to get up and running. For all the details, check out their excellent documentation.
Hopefully you’ll have as much fun with VirtualBox as I have!
Censorship is Evil – Fight it! (updated) May 3, 2007
Posted by amazingrando in Ethics, General, Politics, Ranting.add a comment

Franklin Roosevelt’s Four Freedoms – Thanks to dbking
“Censorship of anything, at any time, in any place, on whatever pretense, has always been and always be the last resort of the boob and the bigot.”
— Eugene Gladstone O’Neill, American playwright
There’s a good story on DailyTech.com about a lot of people getting angry about censorship that was taking place on Digg.com. You can also read about it on CNet. What is at issue is a string of letters and numbers that constitute a key for HD-DVD and Blu-Ray encryption. The AACS has sent nasty letters to Google to take down any blogs they host that discuss AACS encryption circumvention, and in particular have the key. And Google dutifully complied, taking down blog after blog. People submitted Digg stories about this, but quickly found that they were censored by Digg.com… at least until Digg came to their senses. And, kudos to them for standing up for freedom.
The bottom line of the story is that there this random string of letters and numbers and information about AACS that could land someone in jail if published. But why? Expressing them does not mean that you are cracking their encryption. There’s no act. It’s letters and numbers. This is like arresting you for murder because you watched an episode of CSI and you would know some of the tricks of the trade. Moreover, these companies have done a cost-benefit analysis with your freedoms and decided that it’s better to avoid lawsuits than to stand up for freedom.
Exercise your right to free speech and Digg the story at Digg.com. Meanwhile, enjoy a random string of 32 letters and numbers:
09-f9-11-02-9d-74-e3-5b-d8-41-56-c5-63-56-88-c0
UPDATE: There’s an excellent article about the consequences of the Digital Millennium Copyright Act (DMCA) at eff.org. Read it and share it.
UPDATE2: The New York Times also has another good story on the Internet rebellion
How to mount UDF DVDs in Ubuntu May 2, 2007
Posted by amazingrando in Linux Tips, Windows-Linux Transition.26 comments

I’ve been mighty ill recently, so it’s been a while since my last post, but I finally seem to be recovering and it’s time for another post.
Traditionally recordable DVDs or CDs were written with the ISO 9660 file system. This made it work with everything from Linux to Windows to your car’s MP3 player. When DVD movies came out they used a new file system called Universal Disc Format or UDF, which is meant to replace ISO 9660. Ten years later people are still using ISO 9660 most of the time. But, that is changing. One of the biggest reasons for this is that ISO 9660 cannot handle files larger than 4GB. If you want to back up anything bigger than that you either need to split it (which can be a pain to split and recombine later) or you need to go with the UDF file system. I often backup files bigger than 4GB, so I pretty much only use UDF on discs I burn.
Ubuntu (and maybe other Linux distros – Debian?) seem to have a problem mounting UDF formatted discs. The solution to this is as simple as editing your /etc/fstab file and restarting. Here are the steps, from the Terminal:
sudo gedit /etc/fstab
Here you should see a line similar to this:
/dev/scd1 /media/cdrom0 udf,iso9660 user,noauto 0 0
The first part (/dev/scd1) is the device name (could be different with your computer), the second part (/media/cdrom0) is the mount point (where you access the disc in the file system). The third part is the file systems supported. This is where the problem lies. It shows UDF and ISO 9660, but if both are there (which is supposedly ok if comma-separated), then one or the other will not work, depending on the order they are written in the line. So the solution is the change both of those to:
auto
Now the edited line will look something like:
/dev/scd1 /media/cdrom0 auto user,noauto 0 0
Now save the file and restart.
When you restart, UDF and ISO DVDs should work just fine!
Where are the Fesity DVD ISOs? On bittorrent only… April 20, 2007
Posted by amazingrando in Linux Tips, Windows-Linux Transition.add a comment
Where are the DVDs?? (pic thanks to Andrew Mason)
Following up on my prior post, if you’ve looked for a DVD ISO of Ubuntu 7.04 Feisty Fawn, you might have noticed that they aren’t mirrored and there doesn’t seem to be a way to download them. At first I thought that they might not have been available yet. Fear not, they are available, but only via bittorrent. You can find the official torrents here:
Note that the Ubuntu servers are overloaded and getting the torrent file (even though it’s only 88KB) will probably be slow for a few more days, as will starting the torrent since the tracker is hosted at Ubuntu.com as well. Also, it appears that there is no DVD ISO for Xubuntu, which probably makes sense since it’s supposed to be a lightweight version.
Ubuntu 7.04 Feisty Fawn is Released – Get it today! April 20, 2007
Posted by amazingrando in Linux Tips, Windows-Linux Transition.add a comment
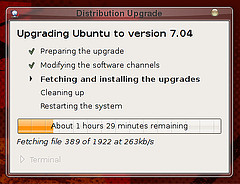
7.04 is here! (thanks to Dhjiz for the screenshot)
Ubuntu is unique among Linux distributions in that it has a six month release schedule that includes a long-term support edition every few releases. Ubuntu 7.04 “Feisty Fawn” was released today with some good improvements. If you want a full ISO, you can grab it here, and when you do, please be sure to download it via bittorrent.
Why via bittorrent?
The philosophy
A number of universities and firms are nice enough to donate bandwidth and servers to mirror CD images (ISO’s), but none of that comes cheap. Bittorrent, by contrast, relies on users like you to contribute a portion of bandwidth and storage. This happens because when you download you are also uploading. With everyone contributing like that, the costs are no higher than the Internet connection you already have. Moreover, it reflects the spirit of Ubuntu and free/open-source – we’re all part of a community which is made better by each of us participating. Don’t worry about legality. Bittorrent is legal (downloading copyrighted content is not, however!). In fact, major studios like Warner Bros. and Fox are now distributing their movies via bittorrent.
Tips – HOWTO
- First, you’ll need a bittorrent client (I suggest Azureus)
- Next, you’ll need to get the right torrent file from Ubuntu.com or official mirrors
- Bittorrent is a great way to get the latest release a at the highest speeds. When mirrors are slow and overloaded, you’ll find that bittorrent is substantially faster because the more people who are sharing, the faster it gets!
- After you’ve downloaded, let it run for a while longer, ideally so that your ratio is >1.000 By doing this it means that you’ve uploaded as much as you’ve downloaded
- Only get the torrent file from Ubuntu.com or one of the official mirrors. That way you ensure that you are you getting the legitimate (and current) version.
Choosing Linux Distrubitions – Tools to help you April 10, 2007
Posted by amazingrando in Windows-Linux Transition.add a comment

Join the revolution! (art thanks to “7 Bits of Truth”)
For people like me who are making their first foray into the Linux world, the choices of Linux flavors can be staggering. Each flavor, or distribution (distro for short), has its own unique characteristics. Some, like Gentoo are build-as-you-go systems that give power users lots of options and speed. Others, like PCLinuxOS are geared towards people new to the Linux world. There are gazillions of them, as you can see at distrowatch.com. So how do you choose one over the other? I’ve found three good tools to help you choose.
1. Linux Distribution Chooser
The Linux Distribution Chooser at zegeniestudios.net is a great way to get started. It will ask you a series of questions, even in your native language, about what your needs are. Then it will give you detailed recommendations and alternatives.
2. Distro Comparison at polishlinux.org
After you’ve narrowed your choices, you can use this website to compare two distros side-by-side and compare everything from installation to wireless support. Very handy.
3. Live CD’s – Give it a try before you install
Many of the top distros have a “Live CD” that you can download. This is a full version of the operating system that runs off a CD. You just download, burn it, and reboot. It’s a very good way to try out the distro without having to install it. You can find a great list of them at FrozenTech’s LiveCD List. Many Live CD’s can also be used to install the OS. So, if you like it you can just take the next step and install right from the CD.
